Wednesday, January 30, 2013

Fun Fabric Flowers


It's very hard to believe,but I started making these fabric flowers almost 33 years ago for my own wedding.  I actually used the same fabric for the flowers that was used for the bridesmaid dresses.  I made a handful of flowers for each table at the reception, and I loved the way they turned out.  Over the years, it seems that weddings had become more "glam", but now a days, each wedding seems to really reflect the aesthetics of the bride and groom.  There are so many choices, from a very formal, evening gown, crystal and chandelier event to an afternoon, informal, "picnic-like wedding."  And, everything in between!   If I were getting married now, I would have a terrible time making a choice!

My nephew is to be married this spring to a wonderful young lady that we all dearly love!  She is sweet, funny, an amazing musician, and best of all, very creative and crafty!  My nephew is very crafty, too, so they have decided to add lots of wonderful, personal touches to their wedding.  Using these fabric flowers as a part of their reception table center pieces, is just one of them!

Since we have a small group of loving relatives to assist in making these flowers, I thought I would prepare a tutorial for them and for the blogging world as well.  Sorry for the zillion pictures, but I truly believe that a pictures is worth a thousand words!


Supplies for making these fabric flowers:
white (fabric/paper?) covered wire
wire cutters
fabric (flowers and leaves)
white crafters glue ( I used Elmer's) 
small sharp scissors
floral tape
long heavier wire for stems (I prefer the covered wire)

Directions:  First you need to decide what type of flower you want to make to determine the shape of each petal.  I chose a round petaled flower, to be used as a focus in the centerpieces.  I also decided to make three different size petals for each flower.  So, as I describe how to make these flowers, please understand that I am only describing how to make these specific flowers. In actuality, the flower type, size, and number of petals per flower are almost limitless!


Making the petal forms:  I decided to make three different size petals, 6 of each size for each flower.  I made an sample petal wire for each size, to make sure that all of the petals and flowers are somewhat uniform.  To protect your scissors, you might want to use a wire cutter to cut the wire.
Since the wire will show on the flowers, I used a cloth/paper (I can't really tell what the wire is covered with) covered white wire. It comes on a spool and is very soft and easy to work with.  I would prefer a sturdier wire, so that the petals wouldn't bend so easily, but the white appears to only come in this strength.  Cut the wire as follows:
(6)  approximately 9" long
(6) approximately  7.5" long
(6) approximately  6" long
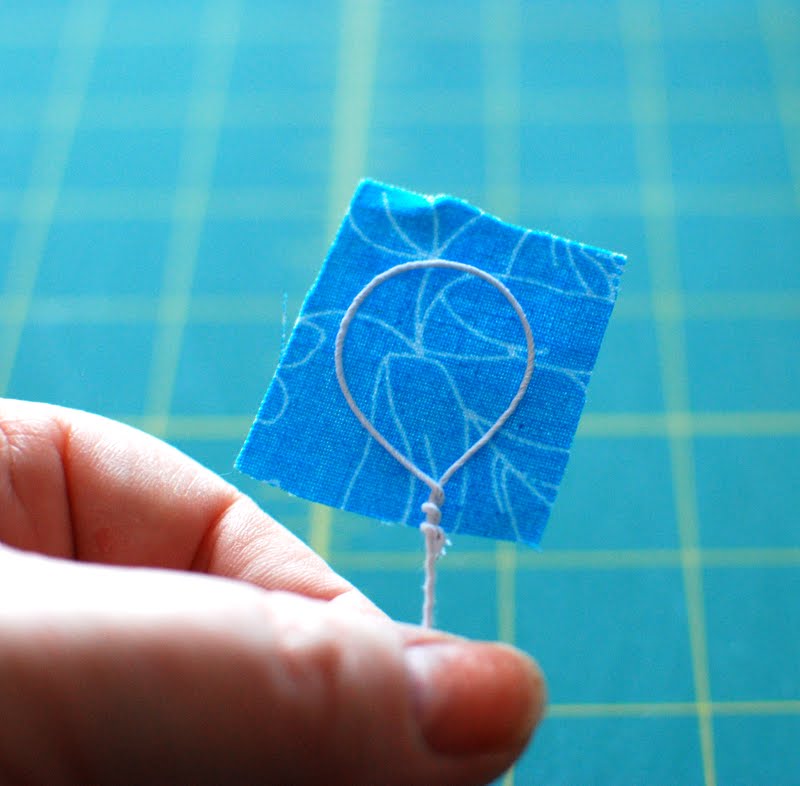
Make each petal by forming a loop and twisting the end.  The large loop is approximately 
2  1/2" X 1  3/4",  the medium sized loop is approximately 1  3/4" X 1  1/2", and the small loop is approximately  1 1/2" X 1".  Compare these loops to your sample petal loops to make sure that they are the same size and shape.  Adjust as needed.  Make 6 of each size.


The petal can be shaped at this point.  (no bends, no kinks, etc)

 Keep the different sized petals separate, as they will be added to the flower according to their size.
 Fabric- I like to use cotton, or cotton polyester fabric, but am sure that other types of fabrics would work.  It is VERY important that the fabric is ironed and that there are no creases.  Creases or folds will definitely show in the completed flower.  Lay a petal on the fabric to determine the size of fabric piece you will need for each flower.  Give yourself a bit of room around the wire to make sure that the wire will fit.  Cut the fabric pieces.  Cut enough fabric pieces for all 18 petals.  Any type print, stripe, check, plaid, polka dot, etc., fabric will work and make for fun and interesting flowers.
 Cut 6 pieces of each size fabric
Adhering the fabric to the wire: 
I use a small paint brush and Elmer's Glue (not diluted) to paint glue onto each wire (one side only).  Use the glue liberally, but not to the point where it's dripping or has lumps of glue.
 When the wire has been "painted" with glue, press a fabric piece onto the wire.  You should be able to do this without getting glue on your fingers, or only a smidgen on your fingers.
Let the glue dry.  I have found that the petals don't lay flat very well after gluing, so I lay them on raised surfaces with the stem pointing out so the the petal portion of the wire has a better attachment to the fabric.  In other words, on the edge of a book, box, counter, etc.
Cutting the petals:  This is the part that is a bit time consuming and where a pair of small sharp scissors comes in handy.  Carefully cut around each petal wire, as close to the wire as you can get without cutting the wire.  If you accidentally cut the wire, toss the petal out, it just won't hold it's shape.  You want a clean edge on the petal. When cutting the fabric, you may notice that a portion of fabric is not glued to the wire; just use your small brush and dab a small amount of glue to the wire and re-attach the fabric.  Let it dry before you continue to cut.
 Cut all the way around each petal.
 When you are finished cutting, you should have six large, six medium, and six small petals.  You are now ready to assemble the petals to create a flower.
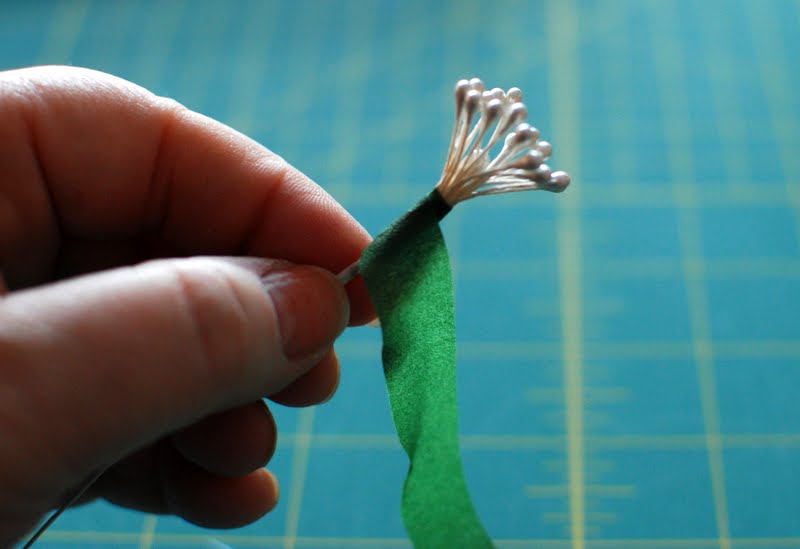
 You can purchase pre-made flower centers, or make our own.  This is a pre-made center.  Just spread/ fan the anthers apart.
 Cut a medium length of floral tape.
Tightly wrap the flower center in floral tape.l
 Add one small petal at a time wrapping tightly with the floral tape after each petal.  The white wire on the petal should face the flower center.  Add three petals.
Now, add the remaining three small petals (one at a time) so that each one is spaced between the other small petals.  The floral tape should be wrapped tightly so that it adheres to itself.
 Now add three medium sized petals, one at a time wrapping the floral tape tightly.  The white wire on the petals should be facing the small petals.  These medium sized petals should be spaced around the small petals
 Add the remaining medium sized petals in the spaces between the previous medium sized petals.  The petals should be added one at a time, wrapping tightly with the floral tape.  If you run out of floral tape, just cut another piece and wrap the core one time before adding new petals.  All the petals will be pointing up. at this point.
 As you add the large petals, the flower will feel a little crowded.  I tend to bend the petal back a bit as I add the large petals to leave more room for the petals and make the tape wrapping easier. 
 Add three large petals to the flower core, one at a time, spacing them out and wrapping each one to the core with the floral tape.
 Add the last three petals to the flower, making sure that the petals are spaced evenly.
 At this point, the petals are all added, but there is no stem.  To save money, I keep the petal stems short, adding a heavier stem wire to the completed flower.
 
 Hold a heavier stem wire next to the petal stems and wrap the entire length tightly with floral tape.
 Voila!
 Shaping the flower:  Bend all of the petals away from the center, one petal at a time.  Be gentle, the wire is soft and bends and kinks easily!
 Start with the large petals.
Then bend the medium petals away from the center.
 Finally bend the small petals away from the center. If you are making a flower, such as a Black Eyed Susan or a Purple Cone Flower, you are finished.
 But, I wanted a flower such as Lotus.  So, I bent each tip back toward the center, as shown above.  On the left:  Purple Cone Flower shape.  On the right: Lotus flower shape.
 Ta Da!  A pretty blue fabric flower.
 How about a yellow and white striped flower?

 Hot pink anyone?
 Variegated Orange?
Different fabrics, flower types, sizes......the possibilities are endless.  Have fun creating your own fabric flower garden or floral arrangement!


Have a great week!

Wednesday, January 23, 2013

Vintage Cakes

I love January because I get to enjoy my new Christmas gifts!  One gift that I have been having fun with is a new cookbook that I received from my brother.  It's called "Vintage Cakes" by Julie Richardson.  It focuses on those classic cake recipes that have endured the test of time.  I have only made two of  the cakes, but so far, they are 100% yummy!

 As the cover shows, there are recipes that I remember my Mom making such as Jelly rolls and Icebox Cakes, but it also includes recipes that I have only read about such as a "Stack Cake".  The Stack Cake was the traditional  wedding cake in southern Appalachia.  According to Ms. Richardson, "wedding guests would each bring one layer of cake, and the bride's family would assemble the layers with a spiced dried apple compote in between- thus the name "stack cake." The more popular the bride and groom, the taller the cake!"
 
The first "Vintage Cake" I made was the "Jam Cake" with caramel chocolate ganache frosting.  This is a three layer cake; the recipe calling for buttermilk, lots of spices, and 12 ounces of jam.  I used home made raspberry jam.  And yes, I forgot to take a picture.  I gave it to my brother and sister-in-law.  They report that the cake was moist and delicious.   I know that the ganache was delicious, I tasted it a few times!

Then, I made this amazing cake!  It's a dark chocolate cake with a layer of bittersweet chocolate ganache on each layer (2) and frosted with a creamy butter cream.  I just love it!  The ganache is very fudgy and tastes wonderful with the cake and buttercream frosting.  The buttercream is made with whipped egg whites, vanilla, and butter.  It's smooth and creamy and not too sweet!  Mmmmmm

 
You can see that I didn't quite spread the ganache evenly, guess I'll have to keep trying until I get it just right!!  Oh, well....eating the mistakes won't be too much of a problem!  

 I am looking forward to making a lot more of these cakes, such as the Gingerbread Icebox Cake, made of stacked gingerbread cookies and mascarpone mousse, The Classic Cake, a yellow cake with chocolate fudge frosting, yes, the Stack Cake, the Butterscotch Cream Roll-up, the Lemon Queen Cakes with Meringue Frosting..........I have a lot of baking to do!  My husband is thrilled!

The "Vintage Cakes" cookbook  would be a  great gift for a baker, or even some new dessert options for yourself.  Enjoy!

Have a great week and stay warm...it is 16 degrees here, brrr!


Friday, January 18, 2013

Vinyl Traveler's Tote


I have a very good friend who has a 3 year old granddaughter for whom she often babysits.  My friend is very creative, and she and her granddaughter always seem to have grand outings and lots of fun!  For Christmas, I made a "Grammy Tote" for her that she could use to pack all the needed essentials for these outings....toys, books, wipes, juice boxes, snacks, water bottles, extra clothes....  I used cotton backed vinyl for the tote so that it would be easy to clean and durable.  This fabric is similar to oil cloth, but lighter weight and more flexible.  I have been wanting to sew with this type of fabric for awhile and was interested in finding out how well it worked with my sewing machine.  So, I read up on the special Teflon presser foots, using clamps instead of pins, possibly the need to sew over tissue paper, etc.   However, it worked beautifully with my machine, without the need for any new adaptations to the machine.  I did use small paper clamps  instead of pins, but that was the only difference. 

The pattern, "The Traveler's Tote" by Anything But Boring, incorporated multiple interior pockets, a magnetic clasp, and an open bottomed pocket to secure a water bottle. 

My friend is very pleased with the tote and has used it quite a bit for outings with her granddaughter.  However, last night, she told me that she is now using it as an electronics tote, and it is perfect.  She is able to take her ipad, Kindle Fire, cell phone, and use each of the pockets to keep the recharging cords separate and organized.  The padding on the sides of the tote along with the vinyl exterior, protect the electronics.  

I am glad that she likes her Christmas gift, and that she is able to use it for multiple  uses.  Since this project was fun to make and turned out well,  I am anxious to make more items from the cotton backed vinyl.  You may also enjoy giving it a try!


It has finally turned very cold here in Michigan and is snowing!  Have a great week, and stay warm!


Wednesday, January 9, 2013

Decorated Step Stools


Every family seems to have a lot of traditions and our family is no exception.  Because I am not a very tall person, step stools are a part of my life.  My father, the carpenter, built me my own step stool when I was little so that I could brush my teeth and wash my hands by myself, get my books off of my tall book shelves, or retrieve anything that I needed.  So, when my children were small, I decided that each of them needed their own step stool.  Thus,  a tradition was started!  At the time, I met a man who constructed unfinished furniture and bought a few unfinished one-step stools which I painted and decorated for each of my kids.  Then, I decorated stools for all of my nieces and nephews, trying to capture subjects that they were interested in.  When they're one or two years old, it is often a guess.    

Now that I have great-nephews, I decided to keep the tradition going and have already painted a step stool for each of our older great nephews.  Our two youngest great-nephews turned one this past November, and I was looking forward to painting a stool for each of them.  However, I was having difficulty finding nice unfinished stools, that were sturdy enough for toddlers!  But, I was in luck and found the perfect stools at OldVirginiaHome at www.etsy.com.   I was thrilled with these stools as they are beautifully made and  arrived in perfect condition to paint.  Even better, the stool  surface is much larger than previous stools, leaving lots and lots of room to decorate.  As you will see, I had a good time painting and I hope the boys love them!

I decorated my funny, sweet, great nephew Hudson's stool with a farm yard scene.  The theme of his first birthday party was all about "The Farm".  He loves to play with his farm toys such as his farm animals, tractors, etc.  But, I hear that he really likes to make the animal noises.


I tried to include all of the essentials that a farm would need such as a barn, of course, a tractor,  a water pump, a vegetable garden, a field of hay and hay bales, a seed bag....


...a corn field, a  Scarecrow, a crow, farm animals, and most important..Farmer Hudson!

Sadly, Hudson and his brother were too sick to attend our Christmas family get-together.  I have heard that the boys are feeling much better, thank goodness, so I am hoping that he is enjoying his stool.


My other, sooo cute, full of energy, one year old great nephew, is Henry.  Since his grandparents live in the Upper Peninsula of Michigan, I decided to paint his stool in what I imagined his grandpa, my brother, would have loved to have as a child...his own tree house in the middle of the woods.  My bother has attained many of his dreams and is a forester who, to this day, spends quite a bit of his time in the northern woods!  I hope that Henry will point to this stool someday and ask his Grandpa to help him build a tree house...what fun!


The focus, of course, is the tree house.  But, I wanted to add as many animals as I could that he may encounter in the woods in the Upper Peninsula.  I had to include a Black bear and its cub, a doe and it's spotted fawn, a moose, a fox, a raccoon, frogs, a snake, a squirrel, butterflies, a Cardinal , and of course, a skunk!  I hear that he has enjoyed looking for and pointing to the animals!


Henry's Mom's name is Teal, so I added the Blue Winged Teals floating by in the river.


The Tree House...any kid's dream.  As you can see, little Henry has everything he needs:  a lantern, snacks- apples he has picked, a bottle of pop, a comic book, baseball, bat and mitt, fishing pole, bow and arrows, and his trusty sling shot!  He has a bucket of water if he needs it, and a tire swing.  He is wearing Scarlett and Gray (his Dad is so happy), and he is also wearing his "Stormy Kromer" hat so he can be just like his Grandpa!


A bit of a closeup of the frogs ,bees, the raccoon, and deer.


I had a lot of fun with the "greenery."  I had to add my favorite tree, the Paper Birch, but also included pine trees, a "Royal" Oak,  a Catalpa, a Willow, and a Mountain Ash.. The bushes and flowers include:  Blueberries, Daisies, Holly Hocks, Cardinal Flowers, Wild Iris, Ferns, Phlox, Milkweeds, Tansy, mushrooms, and Thimbleberry plants.


My sweet husband usually prepares the stools by sanding  (not this time, thanks to OldVirginiaHome), and staining.  He also sprays the final clear protective coat.  I use acrylic paints.

I was so pleased when my niece texted me, that when Henry received his stool, she was fondly reminded of her own stool.  She even sent of a picture of Henry "having fun" with his stool!

Henry and his Step-Stool!  

Family Traditions!  They mean so much!

Hope you have a wonderful week!